Category: Uncategorized
By this point everyone is well acquainted with the power of Hadoops MapReduce. But what youre also probably well acquainted with is the pain that must be suffered when setting up your own Hadoop cluster. Sure, there are some really good tutorials online if you know where to look:
- here is a great one for setting up a single node cluster
- and here is the equally good follow-on tutorial for setting up a complete cluster
However, Im not much of a dev ops guy so I decided Id take a look at Amazons Elastic MapReduce (EMR) and for the most part Ive been very pleased. However, I did run into a couple of difficulties, and hopefully this short article will help you avoid my pitfalls.
Elastic MapReduce, Step by Step
Elastic MapReduce makes everything simple. In just a few steps and in just a few minutes, you can have your own MapReduce job running on a cluster of whatever size and configuration youd like. First you just log on to your AWS console, navigate to the Elastic MapReduce page, and click the “Create New Job Flow” in the top left of the main panel.

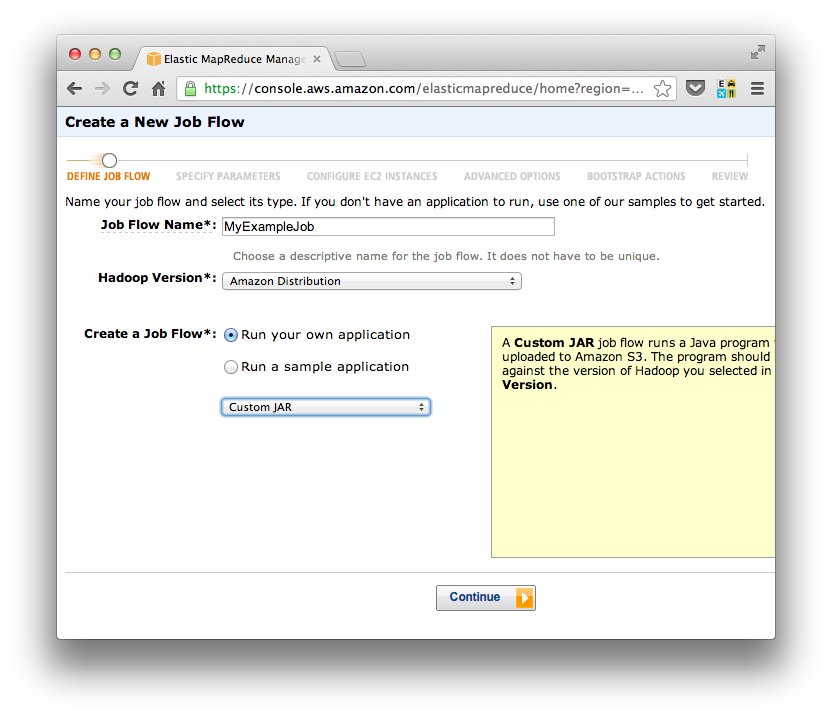
Next you name your job and indicate that you will supply your own custom jar.
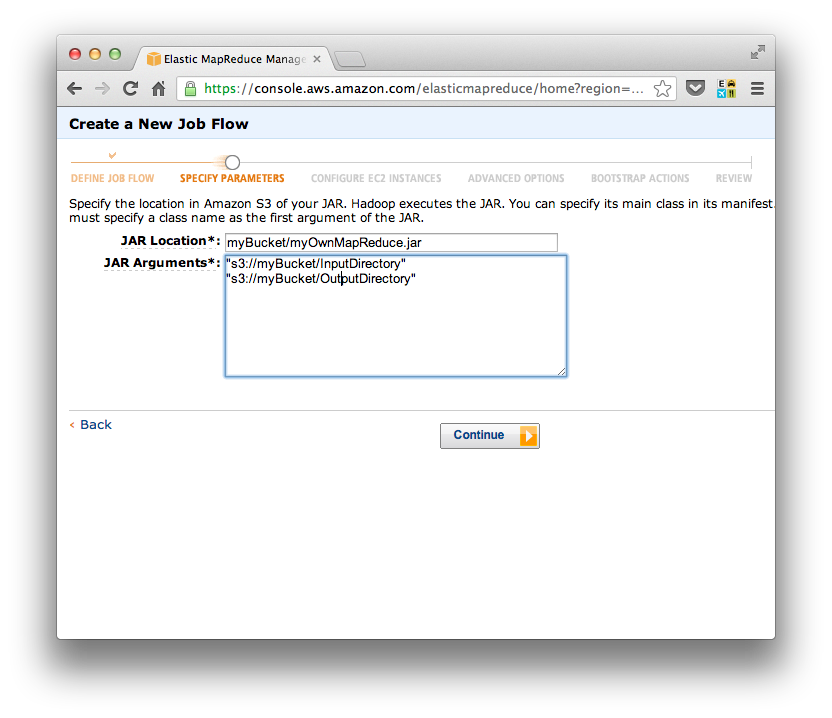
On the next screen you tell EMR exactly where to find your jar file. This is going to be a path that starts with the name of an S3 bucket that you have access to in AWS. You also specify the inputs to your job. For most people this will likely include the path to an input directory and the path to an output directory (as Ive indicated here), but you can use this space to include any argument youd like. There are a couple of potential gotchas here. First, if you did not specify a main class in your jar manifest, then the fully qualified class must be the first argument here. Second, if you are pointing to directories in S3, make sure that you include the S3 scheme at the front of the URI: "s3://yourBucket/yourDirectory"
The next screen is where you get to experience the awesome efficiency of Elastic MapReduce. No futzing with hackneyed deployment scripts; you simply select the type of machine you want for the master, the type and number of machines you want for slaves. As you can see here, Im building a 1021 machine cluster of the largest machines that AWS has to offer! (…And then after I took this screen shot I got scared and returned it to a 3-machine cluster of “smalls”.)

The next screen has a lot of goodies that its well worth paying attention to. If you ever want to be able to ssh into the cluster youre building – which is often a good idea – then you must make sure to specify an Amazon EC2 Key Pair. While youre debugging the setup, its also a good idea to set a directory to send log files to. And while I havent yet found it as useful, its probably also a good idea to enable debugging. And finally, the ssh key is of no use if the job has failed and AWS has shut down your cluster, so click the “Keep Alive” option in case you need to get into the machine and do a post-mortem. As well see in a little bit, being able to ssh into the Hadoop master is also useful for running experiments in the same environment that that your job will run.

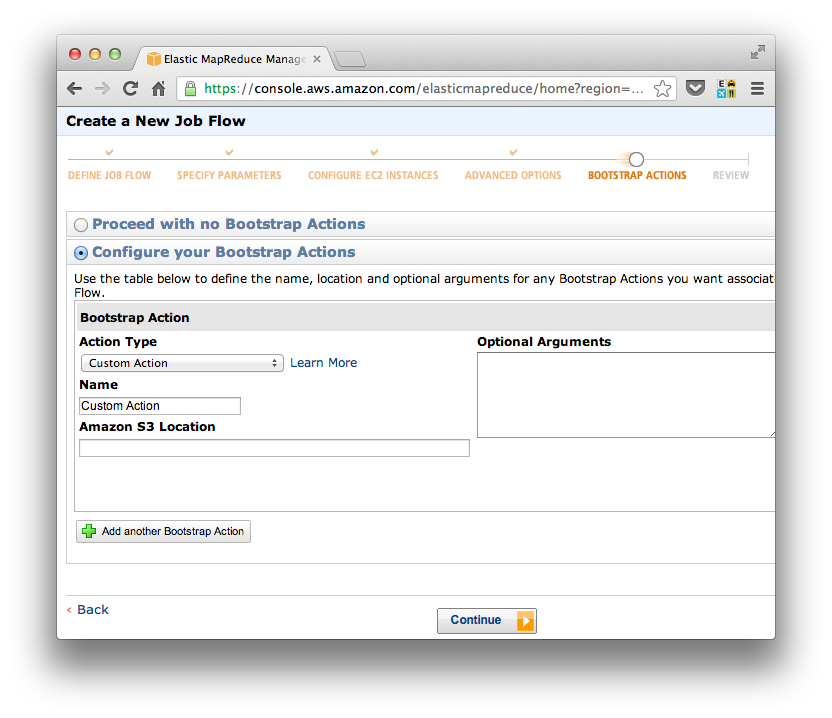
While, I havent had need of them quite yet, the next screen gives you the option to “bootstrap” your Hadoop cluster. So, for instance, you can install software, run custom scripts, or tweak the nitty-gritty configuration parameters of Hadoop itself. For the power user, this should be quite useful.
In the final screen, Elastic MapReduce allows you to review the configuration before you push the big “Create Job Flow” button and things get rolling. Once you create your job flow, then you can check back at the main screen of Elastic MapReduce and watch as your cluster builds, runs, and completes – or in my case FAILS!
Avoiding my Pitfalls in Elastic MapReduce
So lets get into that discussion: What are some of the common pitfalls, and how can you avoid them? Above, Ive already described a couple: make sure to specify the main class of your jar file (if its not already specified in the jars manifest), and since youre probably pulling from and pushing to S3, make sure to use fully qualified URIs including the S3:// scheme.
That last one caused me some pain. Lets take a look at how I tracked down my problem and hopefully it will help you in the future when you are tracking down your own problem.
Notice the big “FAILED” message for my jobs state. That was my first clue that something might be wrong.
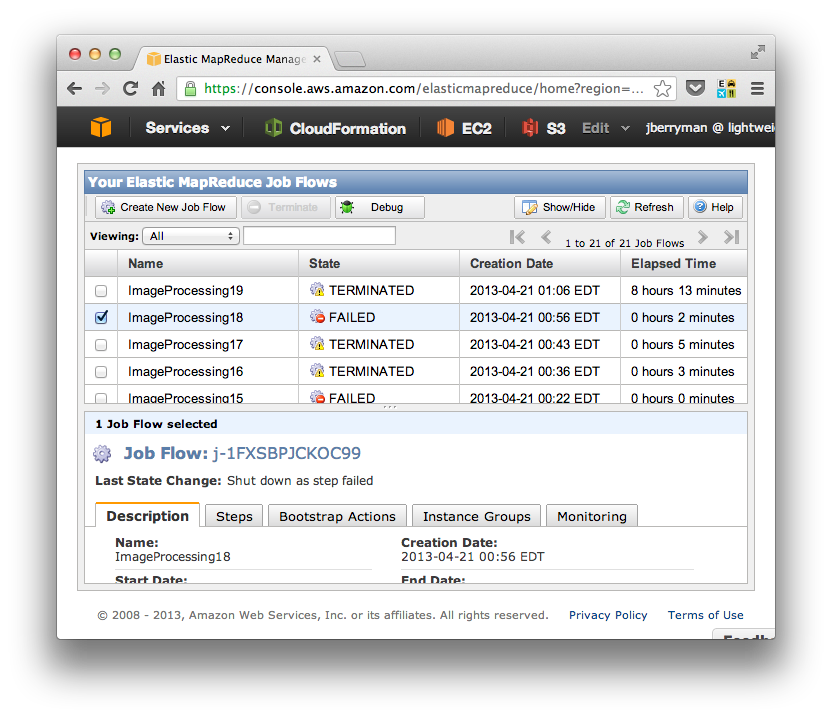
Now notice the “Debug” button in the header of the table. By clicking on this button, youll have access to several useful debugging files.

In my case, the “stderr” file was the most helpful. This is the stderr output that occurred while running the job – so youll get to see where the error occurred in your java code.
For me, the error was about a Null value that basically indicated that a file did not exist. This was troubling because Id run the job several times locally with no problem, and Id double checked, and these files were exactly where (I thought) Id specified. So something was different between my local environment and the environment of my Elastic MapReduce job. But what?!
Fortunately, Id specified an ssh key and indicated that the cluster should be kept alive after running or failing the job, so I could easily ssh onto the box. But heres where debugging gets a little tricky. The error had occurred deep within my code, and I didnt really want to make little tweaks in the java on my local machine, jar everything up and, and send it to the remote machine. The turn around for this process would have been 15 minutes and I would be destroying my code in the process.
Instead, I opted to write Java on the remote machine for a relatively fast debugging cycle. I found that I could use vim to replicate the problematic portion of my code, and in a single line of bash, I could compile my code (Test.java), jar it (as Test.jar), and run it against Hadoop. Heres my magic line:
javac -cp $HADOOP_HOME Test.java; jar cf Test.jar Test.class; hadoop jar Test.jar Test s3://myBucket/myDirectoryAnd, as it turns out, the bug I was having was because Id used the default Hadoop FileSystem
FileSystem fs = FileSystem.get(conf);Instead, I should have retrieved the filesystem from the input path, which takes into account that were talking with S3
FileSystem fs = new Path("s3://myBucket/myDirectory").getFileSystem(conf);And finally, there was one more gotcha in my case that might be of help for you. Its important to know that all JVMs are not equal! Im doing image processing, so Im making heavy use of the Java Advanced Imaging (JAI) API. On my local machine, this comes with the JVM, however the JVM used by Elastic MapReduce doesnt have these dependencies (and possibly doesnt have any of the javax dependencies). In order to fix this problem I had to pull down these extra dependences and make sure they were bundled into my jar file. But, once I did that, it ran as smooth as you please!
All in all, I really like Elastic MapReduce. It gives you the ability to get to work fast without having to worry much about configuration or administration tasks.